Pages

Showing posts with label Mac Tips. Show all posts

About Log Out, Sleep, Restart and Shut Down On Your Mac

Apple Bytes: 

You can log out or put your Mac to sleep if you plan to use it later and at any time, you can restart or shut down your Mac.

Log Out
On your Mac, choose Apple menu  > Log Out.

If you don’t want the app windows you currently have open to reopen when you log back in, deselect “Reopen windows when logging back in.”

If your Mac is set up for multiple users, other users can log in after you log out.

Sleep
Choose Apple menu  > Sleep.

Or press and hold the power button until you see the restart, sleep, or shut down dialog, then click Sleep or press S (or use the Touch Bar).

To put a portable Mac to sleep just close the display.

To wake your Mac, press the Space bar, click the mouse or trackpad, or open the display.

For security, you can set an option to require a password after waking your Mac. You may be able to unlock your Mac with your Apple Watch or use Touch ID instead of entering your password.

Restart
Choose Apple menu  > Restart.

Or press and hold the power button until you see options then click Restart or press R (or use the Touch Bar).

If the pointer freezes on the screen or your Mac becomes unresponsive, press and hold Control-Command while you press the power button to force a restart.

Important: If you force a restart, you may lose unsaved changes in open documents.

If you don’t want the app windows you currently have open to reopen when you restart your Mac and sign in, deselect “Reopen windows when logging back in.”

Shut Down
Choose Apple menu  > Shut Down.

Or press and hold the power button until you see the restart, sleep, or shut down dialog, then click Shut Down, or press Return.

If you don’t want the app windows you currently have open to reopen when you restart your Mac and sign in, deselect “Reopen windows when logging back in.”

If your Mac won’t shut down, press and hold the power button for 6 seconds to force a shutdown.

Important: If you force a shutdown, you may lose unsaved changes in open documents.

A Mac is completely shut down when there is a black screen; some computers also don’t show an active power light or have any fan or drive noise.

You may also need to shut down before connecting or unplugging certain peripheral devices. If you are unsure, refer to the documentation that came with the device.

You don’t have to shut down your Mac when connecting or disconnecting cables, such as USB, FireWire, Thunderbolt, telephone, microphone, headphone, or Ethernet.

Important: If you have a portable Mac, wait for it to shut down completely before closing the display. If you close the display while the Mac is shutting down, it may not shut down properly and may start up more slowly the next time you turn it on.

Credit: support.apple.com

Mac Laptop Power Button

Apple Bytes: 

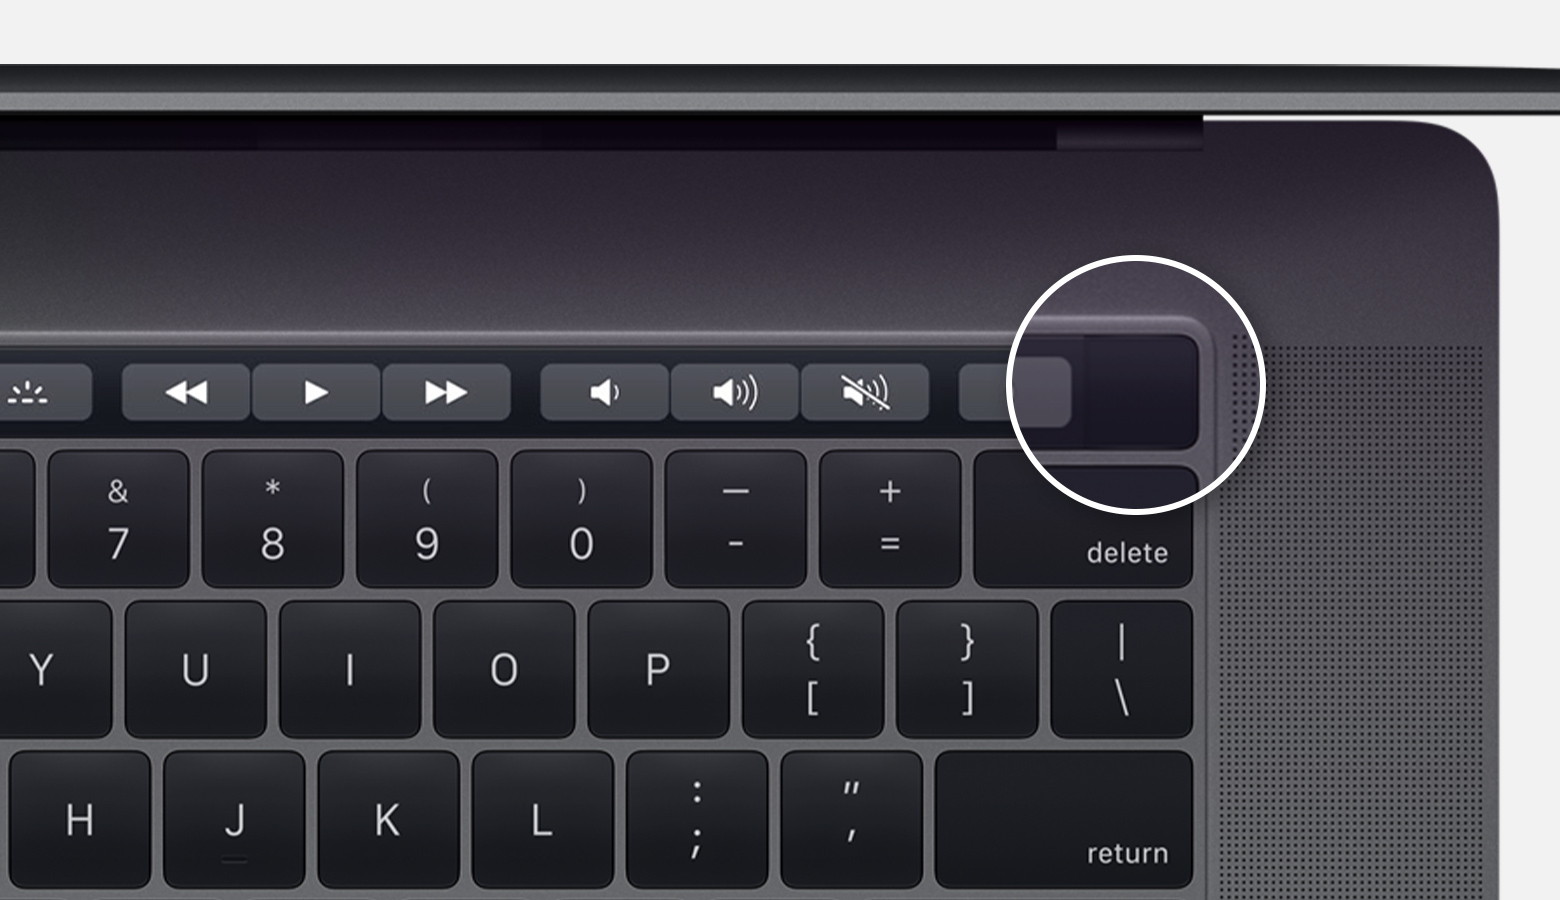
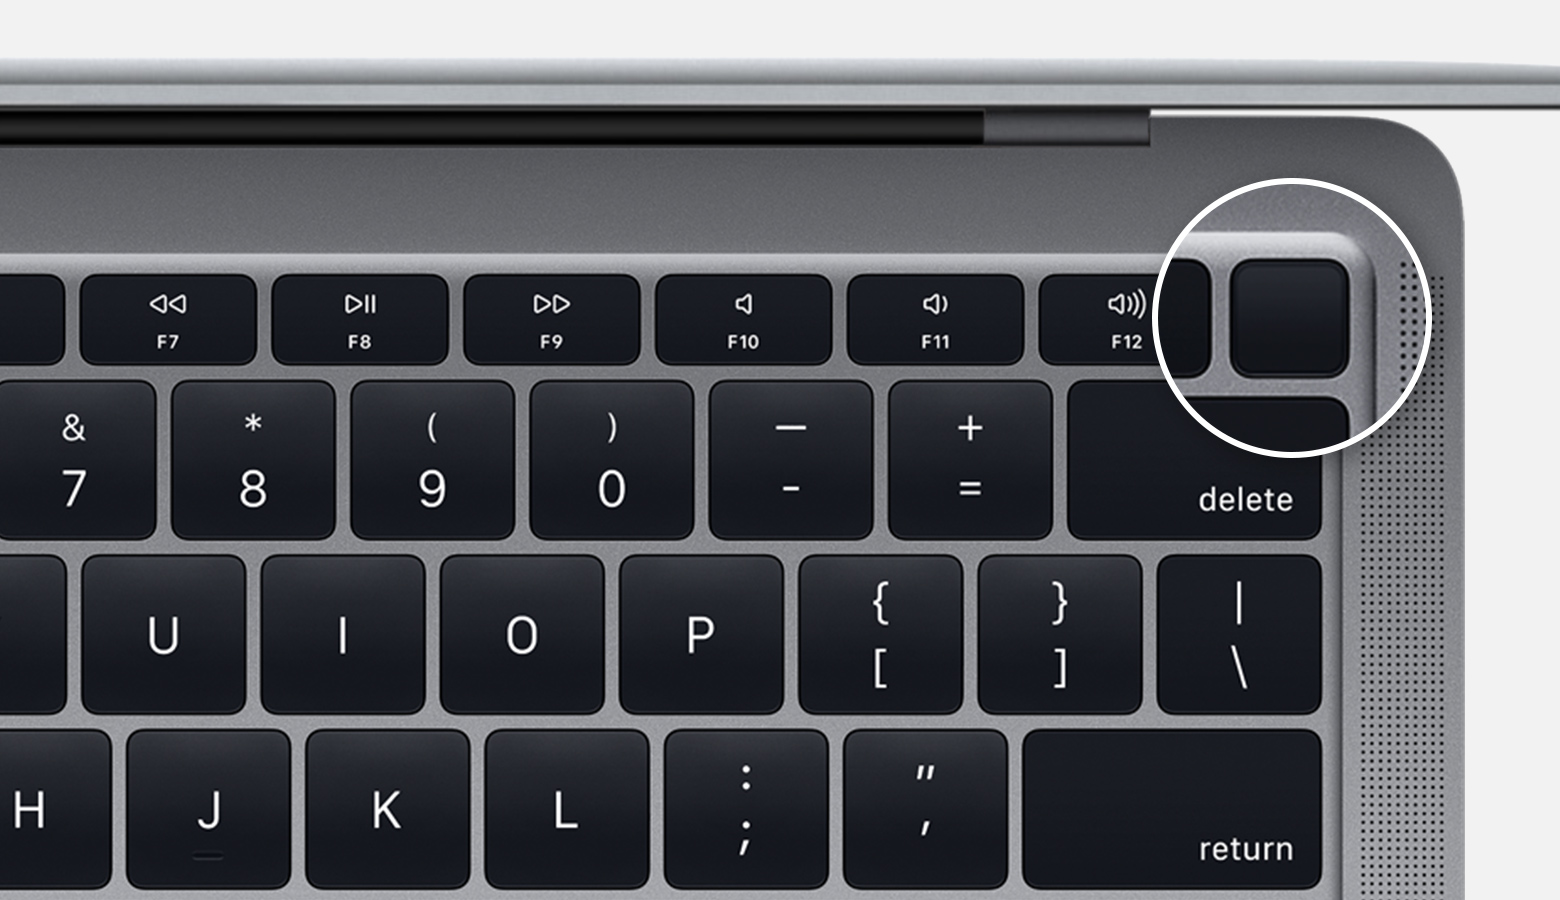
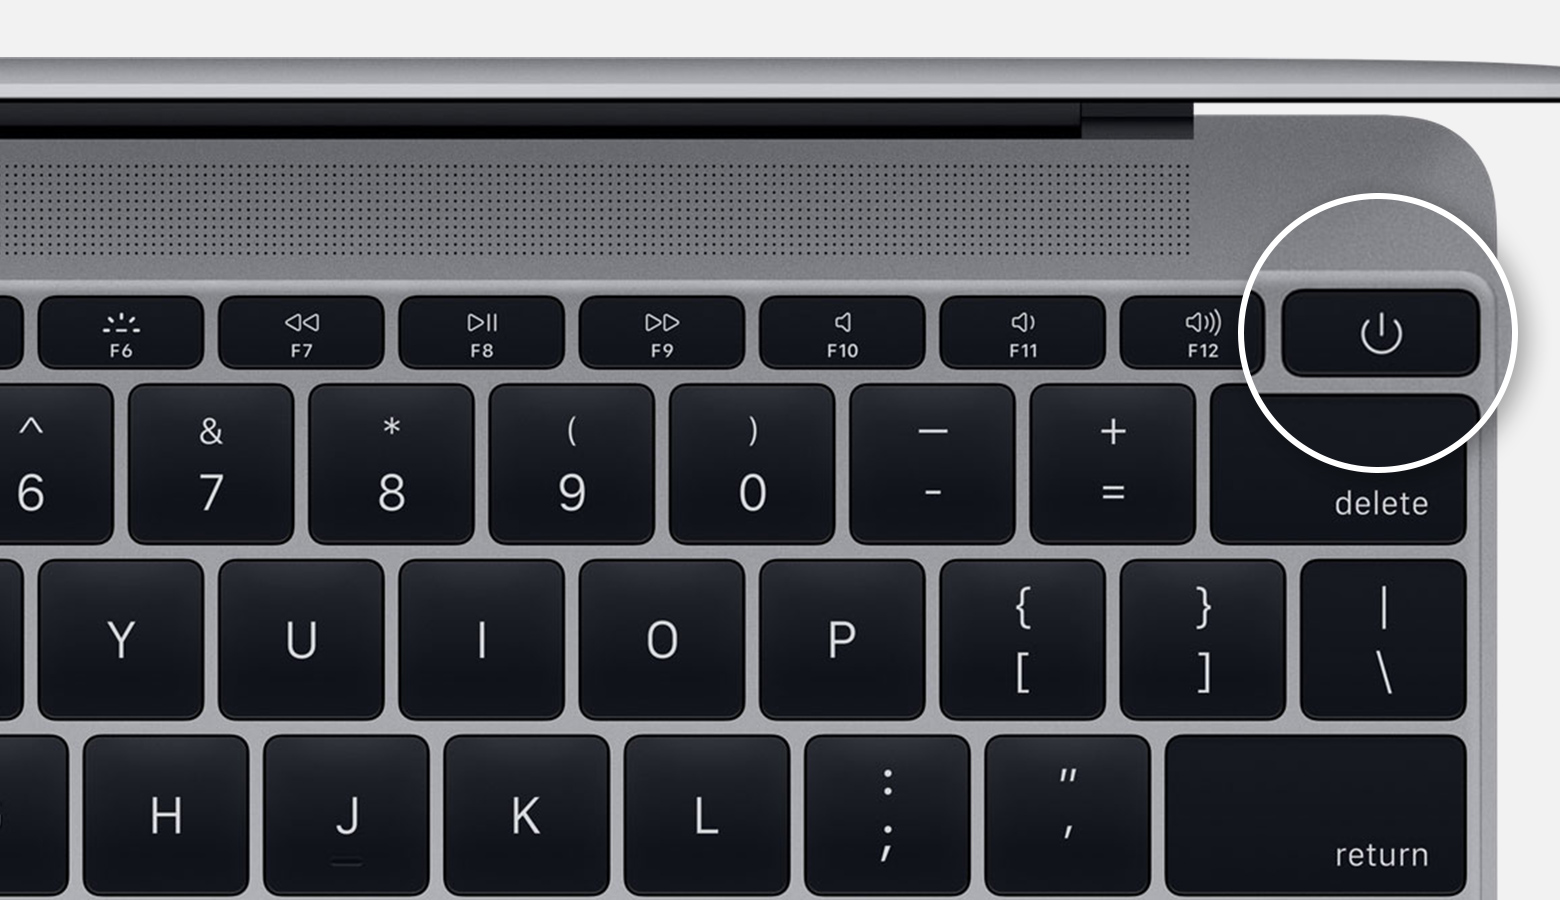
A club member recently stated that she got a Mac laptop but it didn't have a power button that she could find. Here's what Apple's online support has to say:
On MacBook Pro models that have a Touch Bar, Touch ID (power button) is on the right side of the Touch Bar at the top of the keyboard.

On MacBook Air models introduced in 2018 or later, Touch ID (power button) is on the right side of the function keys at the top of the keyboard.

On Mac notebooks with physical function (F1–F12) keys, the power button is a key in the top-right corner of the keyboard.
Newer Mac notebooks also turn on when you do these things:
  • Open the lid of your Mac, even if it's not connected to power.
  • Connect your Mac to a power adapter while its lid is open.
Additionally, MacBook Pro and MacBook Air models introduced in 2018 or later turn on when you press any key on the keyboard or press the trackpad.

If you need help with your Apple product contact the Apple Users Group:

New to Mac?

Apple Bytes: 

If you are planning to buy or recently purchased a Mac computer here are a couple of links that may help you get started, especially when switching from Windows.


Mac Tips For Windows Switchers

Apple Bytes

For those of you who have switched from a Windows computer to a Mac, here are some tips to help you make the transition. Many keyboard shortcuts are similar except that instead of the Ctrl key you will use the Command (⌘) key.
  • Cut = command+X
  • Copy = command+C
  • Paste = command+V
  • Undo = command+Z
  • Print = command+P
  • Save = command+S
  • Select All = command+A
  • Close Window = command+W
  • Switch Apps = command+Tab
  • Quit App = command+Q
  • Find Files = command+space bar
  • Screenshot = shift+command+3
More Mac keyboard shortcuts can be found > HERE.

Here are some other tips for using your Mac.
  • Buttons for closing, minimizing, and maximizing a window are in the upper-left corner of the window.
  • Use the volume control in the menu bar, or use the volume keys on your Apple keyboard.
  • Use Spotlight to quickly find and open apps, documents, and other files.
  • You can also use Launchpad and the Dock to open your apps (programs).
  • Looking for Windows File Explorer? Learn about the Finder.
  • Looking for the Control Panel? Use System Preferences instead.
  • Looking for the Recycle Bin? Use the Trash, which is in the Dock.
  • To rename a file, click the file once to select it, then press the Return key and type a new name. Press Return when done.
  • Preview most files on your Mac using Quick Look. Click the file once to select it, then press Space bar.
  • Back-up files: Time Machine keeps a copy of all your files, and it remembers how your system looked on any given day.

Credit: apple.com

How to find a saved Wi-Fi password on the Mac

Apple Bytes

Here's a helpful post from MacTip.net.

Chances are that you never think of your Wi-Fi password after your set it up. So how can you recover a saved password from your Mac when you forget it? All you need is your administrator account password.
  1. Open the Keychain Access app. It is located in the Applications > Utilities folder.
  2.   
  3. Select the System keychain in the left menu bar, and select Passwords from the category menu. This will filter the keychains to just your stored passwords.

    mac-kaychain-access-app
  4.   
  5. Double click on the name of the network for which you want to view the password.
  6.   
  7. This will open a new window specific to that stored password. Click on the ‘Show password’ checkbox.

    keychain-access-show-password
  8.   
  9. You will be asked to authenticate with a username and password. This account must have administrator privileges on your Mac.

    password-prompt

    If you are unsure what your username is, open up the Finder app and look for the home icon in the Favorites sidebar. Your home folder will called the same as your username.

    find-mac-username
  10.   
  11. After successfully authenticating, the wi-fi network password will be revealed in the previous window.

    view-password

Mac Tips and Tricks, Part 5 of 5

Apple Bytes

There are many tips you’ll need in order to use your Mac more efficiently, regardless of your experience. Some of these will require recent versions of the Mac operating system (OS) such as the latest macOS Sierra – but not all of them do. (select any image to enlarge)


Change which app a file is opened with

If you want a file to open in an app other than its default, select the file and press Command+I, to show its information. In the "Open with:" section, use the drop-down menu to choose a new app.

If you just close the window here, that change will only be applied to that one file; if you want other files of that type to use that same app, click "Change All…" beneath the drop-down menu.


Have things ready at log-in

If there are certain apps that you'll always want to have open when you start up your Mac, you can set this up in System Preferences. Go to Users, make sure your user account is highlighted, then click Login Items.

Click the + and you can choose an application, file server or pretty much anything else that should open when you log in. Once you've added something, you can use the checkboxes to opt to hide it, though it will still be running in the background.

Having lots of these set up can make your Mac slower to start up, though, so if you need to speed things up and temporarily don't need them running, hold Shift while OS X or macOS is logging you in to suppress them.


See your Mac activity with Activity Monitor

If you find your Mac is running slow, or the fans are kicking in when you don't appear to be doing anything too intensive, you can see if you can identify what's causing it. Activity Monitor in OS X and macOS shows you how your Mac's resources are being used.

Launch Activity Monitor from the Utilities folder to see current processes, and the resources they take up. The columns show you things such as the CPU usage of a process or the RAM it's taking up. If there's a process that's hogging resources and you're confident it's not needed, you can end it by selecting it, then clicking Quit Process.

If you're just curious about how system resources are being used, click the tabs (CPU, System Memory and so on) to see graphs of your usage over time.


Back up your Mac

Okay, so we know that people haven't actually forgotten they can back up with their Mac, but we also know that so many people don't bother. Please do! Ever since OS X 10.5 Apple has made it easy to back up using Time Machine. Ideally you should be doing other things to back up as well, but at least do Time Machine. You can pick up a 2TB external drive for less than $90.


Partition external hard drives in Disk Utility

One little known fact about Macs is that they use a different file system than Windows computers by default. That means, if you’re planning on sharing an external hard drive between both Microsoft’s and Apple’s operating systems, you have a few options. While you could format the hard drive to take advantage of the exFAT file system, you would thereby miss out on faster write times.

Luckily, in the Disk Utility app featured in macOS, there’s the option to partition hard drives. In doing so, you can theoretically divide the hard drive in half, with one volume being dedicated to macOS and the other to Windows. Take the hard drive over to your PC and you can format one of those volumes for NTFS, making it the perfect little hybrid device.


View all posts with Mac Tips > HERE.

Credit: techradar.com

Mac Tips and Tricks, Part 4 of 5

Apple Bytes

There are many tips you’ll need in order to use your Mac more efficiently, regardless of your experience. Some of these will require recent versions of the Mac operating system (OS) such as the latest macOS Sierra – but not all of them do. (select any image to enlarge)


Find menu bar options quickly using Help

Some apps have more menu bar options than you can hope to keep track of, but instead of searching through each drop-down list manually, you can use the last Help menu to speed things up. It contains a search box, where you can type in the name of the option you're looking for.

Results come up underneath it, and hovering over a result will show you which menu it's in, or you can just click the result to select it.


Throw files from your Mac to your iPhone

Don't forget that, if you have a modern Mac that has Bluetooth 4.0 and a recent iOS device (iPhone 5 or later, for example), then you can easily send files from your Mac to your iOS device using AirDrop.

The quickest way to do this is to right-click on the file you want to send then pick AirDrop from the Messages fly-out menu, then pick the device you want to send it to. (You'll have to have AirDrop turned on from the Control Center of the iOS device first.)


Resize your windows like a pro

Since Yosemite, clicking the green button at the top left of a window now takes that window full screen rather than maximizing it, but you can restore the old behavior by holding ⌥ as you hover over the green button.

But, there's more! Hold ⌥ as you resize one side of a window and the window also resizes from the other side as well. Hold ⇧ and the window resizes proportionally, aligned to the opposite edge (which sounds a bit confusing but makes sense when you try it).

Or, hold ⌥ and ⇧ when resizing a window for the whole thing to shrink down proportionally around the center. Put it all together and you could click the green button to make a window fill the screen then resize one edge while holding ⌥ and ⇧ so that you make it smaller but keep it centered.


Take control of your windows

You can be quite flexible when it comes to windows in OS X or macOS – not only can you drag from any side to resize them these days, but you can also hold Option to resize them from two sides at once (the one you're dragging and the opposite one), or hold Shift to resize it while keeping it locked to the same proportions.

And while we're talking about windows, if you want to move any that are in the background without bringing them to the fore, hold Command and then drag them around.


Paste text without keeping its formatting

When you copy text from some applications, and especially from the web, you tend to also copy its formatting, such as the text size, font choice and so on. When you then paste this into some text fields, such as in an email, it looks out of place, and can make things hard to read.

To paste the text without its original formatting (so it just formats in the same way as the rest of what you're pasting into), instead of pressing Command+V, press Option+Shift+Command+V. Microsoft Word actually has a "Paste Special…" (or "Paste and Match Style") menu option to do the same thing.


View all posts with Mac Tips > HERE.

Credit: techradar.com

Mac Tips and Tricks, Part 3 of 5

Apple Bytes

There are many tips you’ll need in order to use your Mac more efficiently, regardless of your experience. Some of these will require recent versions of the Mac operating system (OS) such as the latest macOS Sierra – but not all of them do. (select any image to enlarge)


Annotate PDFs and images

Preview has some fantastic tools built into it for annotating images and PDFs. And, what's best of all is that the annotations it adds to a PDF are based on a standard that's compatible with Adobe's PDF app, Acrobat, which is used by Windows users and companies - so it's easy to share annotated documents with colleagues.

Make sure the Edit Toolbar is visible (from the View menu) and you'll see you've got options for drawing shapes, arrows, speech and thought bubbles and more. There's also the option to highlight text in different colors, strike-through some text, add notes and type some text into boxes.


Get wireless audio and video with AirPlay

AirPlay is Apple's technology for streaming audio and video around your house, and it's available on both iOS devices and Macs. Most Macs can stream audio to AirPlay speakers, while newer Macs can also mirror their displays to an Apple TV, letting you show something on the big screen.

For basic AirPlay output from iTunes, you just need to click its symbol – the rectangle with the triangle cutting into it – next to the volume bar and choose where you want to send the music. If you want all of your system audio to come from the speakers instead of just music, though, hold Option and press a volume control key to open the Sound preferences, where you can choose an output (or use the Menu bar tip already mentioned).

If an Apple TV is on the same network as your Mac, an AirPlay icon will appear automatically in the menu bar. To start mirroring your screen, select it, then click on the name of your Apple TV.


Add a Guest User account to your Mac

As you probably know, you can add multiple users to your Mac, so that every person in your home or office, say, can have their own space to work and to set things up how they like them. But there's another kind of account you can turn on, a Guest account.

Turn it on in System Preferences > Users & Groups, and now you'll be presented with Guest as an option at the login screen. Anyone can use it - no password needed - but once they're finished everything they do will be wiped. This is great not just for Macs in foyers or spare rooms, say, but it's also great if a friend or colleague says, "Can I just borrow your Mac for a minute to do something?"

You probably should turn off Automatic login and set your Security & Privacy settings to require a password after, say, five seconds of sleep or screensaver time. That way you can be sure nobody will be able to access your stuff, but when they try to use your Mac they'll be offered the option of switching users and can then pick Guest.


Cover your tracks in Safari

It used to be in Safari that if you wanted to delete caches and history, you only had the nuclear option, nix everything.

Since Yosemite, though, when you choose Clear History and Website Data from the History menu of Safari, you get the option of covering your tracks by clearing data from the last hour, today, today and yesterday or, as before, from all time.

It clears your history from all devices signed into your iCloud account too.


Email huge files

Email isn't really meant for file transfer, but – let's be honest – we all do it. Problem is, many email providers flat-out won't let you send attachments over a particular size (often only a few megabytes) so sending large files over email is usually a no-no.

With Mail since Yosemite, though (and in fact with the webmail version of Mail at icloud.com), you can email files up to 5GB in size. What in fact happens is that the attachment really gets uploaded to iCloud, and then a link is sent to your recipient where they have 30 days from which to download it.

(If your recipient is using Mail on Yosemite/icloud.com, they'll probably just see the attachment in their email client as usual rather than being shown a link.)


View all posts with Mac Tips > HERE.

Credit: techradar.com

Mac Tips and Tricks, Part 2 of 5

Apple Bytes

There are many tips you’ll need in order to use your Mac more efficiently, regardless of your experience. Some of these will require recent versions of the Mac operating system (OS) such as the latest macOS Sierra – but not all of them do. (select any image to enlarge)


Make a keyboard shortcut for anything

Keyboard shortcuts are great for saving time, but you're not limited to just the shortcuts put in by developers. If there's a particular menu option you use all the time that doesn't have a shortcut, you can create it yourself.

Go to System Preferences > Keyboard > Application Shortcuts. Click the + button to add a new shortcut. You can choose which app you want to apply it to from the drop-down list, but you must know the exact name of the menu command to type into the next box, including the correct case and any special characters such as ellipses. Lastly, choose a unique key combination to invoke the command, then click Add.


View someone's screen remotely

One really easy way to view someone else's screen or even control their Mac over the internet – which is invaluable if you're helping troubleshoot a relative's computer problems – is to launch Screen Sharing by searching for it with Spotlight then entering the Apple ID of the person you're trying to contact. (If you or they don't know it, just have them look in the iCloud pane of System Preferences. And while they're there, make sure Screen Sharing is enabled in the Sharing pane of System Preferences.)

They'll be asked to grant you permission to view their screen, and they can also then click on the screen sharing icon in the menu bar and grant you the ability to virtually, remotely control their mouse and keyboard too.


Adjust the volume in smaller increments

When you use the volume up and down keys on your Mac's keyboard, the difference between one tap and the next can actually be pretty big – especially if you're driving some meaty external speakers. Hold down ⌥ and ⇧ as you tap those keys, though, and the increments become much smaller.

And here's a bonus tip: if the audible feedback when you change the volume annoys you, you can turn it off in the Sound section of System Preferences, but, and here's the clever bit, you can temporarily toggle it back on by holding ⇧ when you change the volume – handy when you're not sure whether your Mac isn't making a noise because the system output is configured incorrectly or because the app you're trying to use is at fault.


Rename, duplicate and revert files easily

In OS X Lion, Apple introduced some new features for working with files, and a new hidden menu to access them. When you've opened a document, move your cursor over its name to bring up a small black arrow just to the right.

Click this arrow and you bring up a menu with some of these new options. The most useful are the ability to rename and duplicate files, but you can also lock a file to prevent further editing, change it so that the file is stored in iCloud instead of only on your hard drive (though only in compatible apps), or move the file.

The flashiest feature is the ability to revert to a previous version of a file, though, you can choose an older version from what's listed in this menu, or click 'Browse All Versions…' to enter a Time Machine-like interface, where you can scroll through older versions of that file and compare them to the current one.


Cure an insomniac Mac

You might find that occasionally when you close your MacBook's lid or pick Sleep from the Apple menu on your iMac or Mac mini that it refuses to go to sleep.

Happily, getting to the bottom of this problem is easy. Since Yosemite, you can chose from the View > Column menu when you're on Activity Monitor's CPU tab to show a column of processes that are preventing sleep. Click this column header to sort by it, and then you can easily find what apps are keeping your Mac awake, then quit them if necessary.


View all posts with Mac Tips > HERE.

Credit: techradar.com

Mac Tips and Tricks, Part 1 of 5

Apple Bytes

The Mac is amazing. And, there are many tips you’ll need in order to use your Mac more efficiently, regardless of your experience. Some of these will require recent versions of the Mac operating system (OS) such as the latest macOS Sierra – but not all of them do.

In many instances these are handy examples of functionality that Apple has sneaked into upgrades you would have otherwise totally missed out on. (select any image to enlarge)


Automatically hide and show the menu bar

The menu bar has been a fixture on the Mac since it launched in 1984, but since OS X El Capitan, you can hide the menu bar. Open System Preferences, go to General, then click "Automatically hide and show the menu bar."

When you tick this box off, the menu bar will reappear as you glide your mouse arrow towards the top of the screen, allowing you to get at all your menus.


Run Windows

O.K. Who wants to run Windows? But sometimes it's handy, whether to play the latest games or run some niche piece of software that has no Mac equivalent.

You can either run Windows alongside macOS with a virtualization app such as VMware Fusion, Parallels Desktop or VirtualBox, or partition your hard disk to install Windows on to run it full-bore on your hardware using Boot Camp Assistant (in your Utilities folder).


Sign PDFs right in Mail

If you are emailed a PDF to sign, you don't have to worry about printing it, signing it, then scanning it back in, you can actually sign it right in Mail.

Drag a PDF into the email you're sending, hover over it then at the top right you'll see a little button appear, click it, and you get a range of Markup options, including one for signing documents. Best of all, you can either add your signature by holding a signed piece of paper up to the webcam on your Mac – and it does a great job of cutting it out of the background – or by drawing on your trackpad.

Got an iPad stylus? Try using that instead of your finger!


Use Split Screen

Working with two windows or apps side-by-side became much easier since OS X 10.11 El Capitan, thanks to Split Screen view. By holding down a left-click on an app's green maximize button in the top left-hand side, you can then drag it to be positioned on the left or right-hand side of the display.

You'll then need to pick a second open window or app to snap to the opposite side. Split Screen obscures the launcher and OS X's Menu Bar, so you get a bit more screen real-estate and fewer distractions.

Dividing the separating line between the two apps lets you make them smaller or larger, which can come in handy for keeping an eye on live information such as sports scores at one end while being productive on the other.


Quickly import with Image Capture

People sometimes overlook Preview's power features and almost always ignore Image Capture completely. Before you clog up your system with bloatware apps and drivers for digital cameras and scanners, though, try Image Capture – it's in your Utilities folder.

With this you can control most modern scanners (or the scanners in multifunction printers) both wired and wirelessly, and import from digital cameras, including iOS devices.

Pop up the panel at the bottom-left for extra options. It's here, for example, that you tell your Mac what app should launch when you connect each of your devices (including 'none') so you could launch Aperture when you connect your SLR, say, but launch nothing when you dock your iPhone.


View all posts with Mac Tips > HERE.

Credit: techradar.com

LABELS INDEX:

* (5) 2038 Problem (1) 3G - Goodbye (1) 5G (2) Abine Blur (1) Activation Lock (1) ADAS (1) Add sound to Impress (2) Address Book (1) AirTags (3) Amazon (3) Android (2) Android phone (2) Annoying Ads (1) Anti-Virus (1) App Store (1) Apple Bytes-2019 (12) Apple Bytes-2020 (19) Apple Bytes-2021 (13) Apple Bytes-2022 (10) Apple Bytes-2023 (11) Apple Glass (1) Apple Maps (1) Apple Repair (2) Apple Support (2) Apple TV (1) Apple Watch (6) Archives of CTC (7) ARM M1 Processor (1) Attachments (1) Audio Files (1) Autonomous (1) Avast (1) Backups (3) Bank-fraud (1) Battery Icon (1) Battery life (4) Battery Replacement (1) BCC (1) Best Buy (1) Big Data Mining (1) Big Sur (1) Bloatware (1) Board Minutes 2019 (12) Board Minutes 2020 (12) Board Minutes 2021 (12) Board Minutes 2022 (12) Board Minutes 2023 (12) Board Minutes 2024 (2) Boom Supersonic (1) Browser Attack (1) Browser Settings (1) Browser Tabs (1) browsers (1) Cache (1) Camera App (1) Caps Lock Indicator (1) Car charging (1) Car Door Lock (1) Cell phone strength (1) Cell Phones (1) Charge Cycles (1) Chevy Bolt (2) Chrome browser (2) Chromecast (1) Clone vs Image (1) Cloud Computing (1) Colorado (1) Construction (1) Contact Removal (1) Converting CDs (1) coronavirus (1) Coupons (1) COVID-19 (1) Covid-19 Detection (1) CPAP Recall (1) CTC 2023 ISP Survey (1) Customer Support (1) Dash Cams (1) Default browser (1) Delete Apps (2) Digital Estate Planning (1) Disable Thumbnails (1) Disk image (2) DogWalk malware (1) Domino's (1) Download Videos (1) Drive Partition (1) Driver Assistance (1) Drones (3) Drywall (1) DuckDuckGo (4) E-bikes (1) E.A.S.Y Pay (1) ebooks (1) Edge (1) Edge Browser (4) EdgeDeflector (1) Electric Bicycles (2) Electric car batteries (1) Electric Cars (6) Electric Trucks (1) email (1) Email Aliases (1) EV (13) EV Charging (1) External Storage (1) Facebook (4) FaceTime (3) Fake Reviews (1) Fast Charging (1) FBI Warning (1) Fiber Optic Cable (1) FIDO (1) File & Folder Icons (1) Firefox (2) Firefox Relay (1) Fitbit (1) Force Quit (1) Future Tech (1) Gmail (2) Gmail Contact (1) Googerteller App (1) Google (1) Google Maps (1) Google Music (1) Google Play Store (1) Google Search (1) Google TV (1) Group Text (1) Hacking (3) Harley-Davidson (1) Headlights (1) Healthcare (1) ID.4 (1) Identify Music (1) Image vs Clone (1) iMessage (2) Incognito Mode (1) Instagram (1) Intel Drivers (1) Internet Explorer (1) Internet of Things (1) Internet speed (1) iOS 13 (1) iOS 14 (2) iOS 15 (2) iPad (5) iPad Air (1) iPadOS 15 (2) iPhone (16) iPhone 12 (1) iPhone Battery (2) iPhone SE (1) iPod Touch (1) ISO Files (1) ISP Down? (1) Karen's Replicator (1) Keyboard (1) keyboard shortcuts (2) LibreOffice (1) LibreOffice Impress (1) Linux Mint 19.2 (1) Lithium-Iron Phosphate (1) M2 Processor (1) Mac (1) Mac Tips (10) MacBook Air (2) macOS (4) Magnifier (1) Mail App (1) Malware (4) Mars (1) Masked Email (1) meetings (6) Microcomb (1) Microsoft (1) Mirroring Tips (1) Mobile Wi-Fi Hotspot (1) Mouse Speed (1) MyHealtheVet (1) NASA (1) Norton (1) old computers (1) OneDrive (1) Ookla (1) Oregon (1) Oura Rings (1) Outlook (1) Parallels 18 (1) passwords (1) PDF (1) PDF Editing (1) Phishing Scams (1) Phone Data Swap (1) Phone Scams (1) Plug & Charge (1) Pop-Up Blocker (1) Portable EV Chargers (1) print spooler (1) Printer problem (1) printers (2) Privacy (5) Privacy Settings (1) Private Browsing (1) Pro Pilot (1) RAM (1) RAM 1500 REV Pickup (1) Range anxiety (2) Range Extended Vehicle (1) Ransomware (3) Rebooting (1) Recharge Cycles (1) Remote control (1) Robots (1) Roomba robots (1) Router (3) Samsung Drive Storage (1) Samsung Gallery Sync (1) Scams (1) SD Cards (1) Search Engines (3) Search Tips (1) Secret Button (1) Security Flaw (1) Security Key (1) Security Warning (1) Sharing From Phone (1) Short Codes (1) Show Wi-Fi Password (1) Signal Strength (1) Sion (1) Siri (1) SkyDrive (1) Slide Over (1) Slow Internet (1) Smart Glasses (1) Smart Home (1) Smart Toys (1) Smartwatch (1) Solar-powered EV (1) Sono Motors (1) Speed Wars (1) Split Screen (1) Split View (1) Spreadsheets (1) Spy Pixel (1) Start Up (1) Startpage (1) Streaming (1) Streaming Services (1) Street View (1) Surface Duo (1) Surface Earbuds (1) System Tray (1) Tab Syncing (1) Tbps (1) Teams (1) Technology Channels (1) Telegram app (1) Tesla (6) Tesla Adapter (1) Tesla Model 3 (1) Texting (1) Tracking (1) Tracking Pixel (1) Two-Factor Authentication (2) Undo Send (1) Unlock Phone (1) Update problems (1) USB drive (1) USPS Informed Delivery (1) VA access (1) Verizon (1) Vertical TV (1) Video Conferencing (1) Videos (3) Voice Assistant (1) Vultur (1) VW (1) Web Beacon (1) WhatsApp (1) wi-fi (2) Wi-Fi Hotspot (1) Widgets (1) Win 10 Performance (5) Windows (1) Windows 10 (9) Windows 10 Tips & Tricks (1) Windows 11 (8) Windows 7 (1) Windows S Mode (1) Windows Update (1) Windows update problem (1) Wink (1) Winstall (1) Yahoo mail (1) Yippy (1) You've Been Hacked (1) YouTube (1) Zero Emissions (1) Zoom (2)